Nothing beats the crackling sound and dancing flame provided by a wood fire! Today’s modern wood stoves and inserts allow you to add unmatched heating capacity and comfort to your home, providing long, overnight burns while producing fewer emissions.
Whether you burn wood in a fireplace, stove or insert, using good quality firewood and properly loading your unit is the key to convenience, efficiency and safety. Learning the best types of wood to use and how to load your unit correctly will allow you to utilize more of the available heat, burn less wood, and enjoy the warmth and beauty of a real wood burning fire.
The Importance of Seasoned Wood
Good planning, seasoning and storage of your firewood supply is essential to successful wood burning. Seasoned wood is wood that has been stored and dried, significantly reducing the moisture content. Using wood that is seasoned, which can take anywhere from 12-36 months depending on the type of wood and the climate, will help to improve the efficiency of your unit and increase the heat output. Hardwoods, which are more dense, will need to be seasoned longer then softwoods.
Ideally, the wood you use in your unit should have a moisture content of below 20%. Fresh wood that has not been seasoned will have a moisture content as high as 60-80% . Burning unseasoned wood will result in your unit being less efficient, producing less heat and an increased level of creosote emissions, and can even cause damage to your unit.
Learn how to tell if your wood is properly seasoned, as well as tips for effectively seasoning and storing your wood.
How to Properly Season Wood for Burning | Regency Fireplace Products (regency-fire.com)
Types of Wood
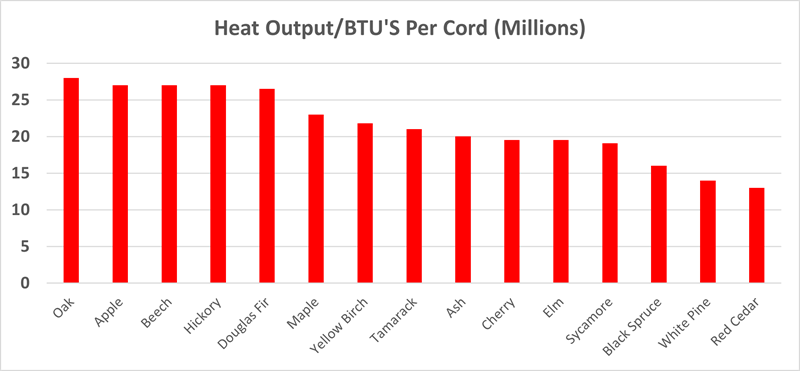
The type of wood you burn plays a big factor in the performance of your stove. Hardwoods, such as oak and maple, are generally more dense, which allows them to burn longer and produce more heat, making them a more efficient fuel source. Softer woods, including spruce and pine, are great to use as kindling, as they will produce a large, bright flame and burn very quickly.
Below are some characteristics of popular wood types found across North America:
- Apple- a dense hardwood that generates a high amount of heat and burns slowly, needs to be well seasoned and is often more expensive then other hardwood options
- Ash- produces a high amount of heat and will burn at a steady rate, good flame, has a lower moisture content and shorter seasoning period compared to other hardwoods
- Beech- excellent firewood that burns hot and clean, producing a steady fire, can be difficult to split and needs a long seasoning period
- Birch- produces a medium amount of heat and burns very quickly, is best when mixed with slower-burning woods, excellent for starting a fire
- Cedar- a lighter weight softwood that splits and lights very easily, a great choice for starting a fire
- Cherry- produces a medium amount of heat and burns slowly, best when seasoned at least one year
- Douglas Fir- one of the most popular softwoods, has a high density and will burn slowly
- Elm- a very heavy hardwood that generates a low amount of heat, smokier than other common woods and difficult to split, burns very slowly but produces little flame
- Hickory- provides exceptional heat output and produces extremely good coals capable of burning throughout the night, easy to light and produces fires that are hot and long lasting
- Maple- a hardwood that is easy to light and will burn long, slow and steady, splits easily and is readily available in many areas
- Oak- very dense hardwood and one of the most popular choices for firewood, burns slowly and cleanly, needs a long seasoning period (up to 2 years) due to its density
- Pine- a softer wood that burns well producing a low amount of heat, excellent for kindling, can leave sooty deposits due to it’s high sap content
- Spruce- a low density softwood that is easy to split and best used as kindling, needs to be seasoned properly
- Sycamore- burns well producing a moderate heat output, easy to light, one of the best firewoods for starting fires but not for long term burning, can be challenging to split
- Tamarack- a higher BTU softwood that burns hot and is long lasting for a softwood, easy to light, splits well and dries quickly
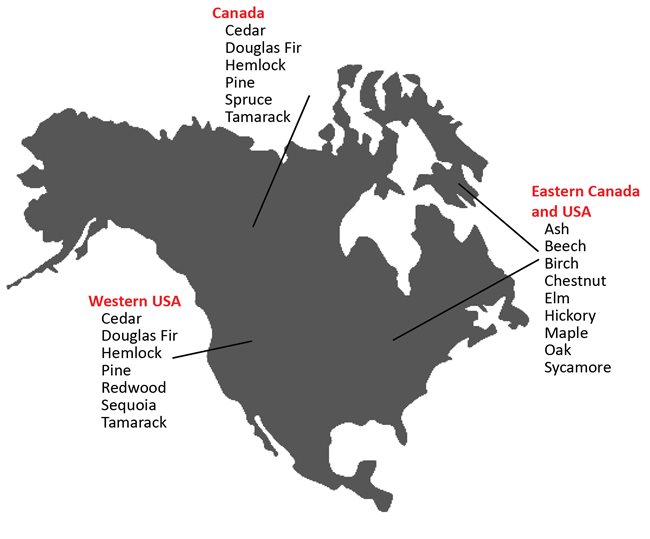
The types of wood you will have access to will vary greatly based on geography. It is important to be aware of the different types of wood that are available in your area, and how they will affect your burn times and heat output.
Log Size
Not only is the type of wood you use important, the size of your logs and how they are loaded in the firebox will also effect the efficiency and performance of your wood stove or insert. Fully loading your firebox will maximize the efficiency of your unit and help to ensure a long, warm fire for as long as possible.
The maximum log size you can use in your wood stove or insert is determined by the size of the unit’s fire box and will vary depending on the specific model. All Regency wood stoves and inserts can accommodate at least an 18” log loaded side to side, while our largest models can fit up to a 22” log and can be loaded side to side, as well as front to back.
The following is a list of our current wood stoves and insert models and the maximum log size they can accommodate when loaded side to side or front to back. If you are unsure which Regency model you have, our
online guide can help you in identifying the correct model.
Regency Wood Insert Log Sizes
|
| Model |
Log Size Side to Side |
Log Size Front to Back |
| CI1150 |
18" |
- |
| CI2701 |
22" |
17" |
| I1150 |
18" |
- |
| I1500 |
18" |
- |
| I2450 |
18" |
17" |
| I2500 |
18" |
16" |
| HI1150 |
18" |
- |
| HI2450 |
18" |
17" |
| HI500 |
22" |
17" |
Regency Wood Stove Log Sizes
|
| Model |
Log Size Side to Side |
Log Size Front to Back |
| F1150 |
18" |
- |
| F1500 |
18" |
0 |
| F2450 |
18" |
17" |
| F2500 |
18" |
17" |
| F3500 |
20" |
17.5" |
| F5200 |
22" |
20" |
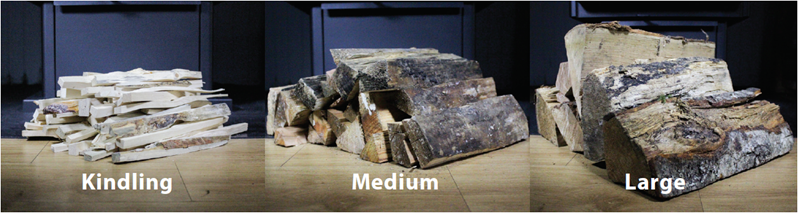
While fully loading your firebox with larger logs is ideal for long burns, it is important to keep a variety of smaller wood sizes on hand as well. Smaller kindling and medium split logs burn quicker and will be important in the startup process of your unit, allowing you to get the firebox warm and establish a hot bed of coals before adding larger logs. These smaller pieces of wood will also come in handy in filling gaps between larger logs when you are trying to fully load your firebox.
Tips for Loading & Starting Your Wood Unit
Today's EPA certified wood units are incredibly efficient and require some adjustments to use, especially if you are used to burning in an old-school wood stove. Because modern wood stoves and inserts require a longer startup period, even experienced wood burners can have trouble operating a new wood stove or insert the first few times.
The steps below will walk you through properly loading and starting your unit to assist you in creating a successful start-up and then transitioning into a long, over-night burn.
Note: The process is the same for both Hybrid-Catalytic & Non-Catalytic EPA units, however with Non-Catalytic units there is no Catalytic Bypass to engage or disengage just the air control.
- Crumple lots of black and white newspaper (avoid colored newspaper or paper with lots of ink).
- Ensure both the bypass & air control are fully open
- Build a log cabin/teepee of small finger sized pieces of pieces of kindling – ensure you stack wood to allow lots of airflow between pieces.
- Light Paper & Close Door 95% of the way – allowing space for significant airflow.
- Once kindling has fully ignited (engulfed in flames), add additional kindling and close door approx. 95% of the way.
- Once the second batch of kindling has ignited, add 2-3 wrist-sized pieces of wood and close the door again approx. 95% of the way (Air control & Bypass still Open).
- Once the wrist size pieces have fully ignited, add an additional 2-3 wrist sized pieces and close the door again approx. 95% of the way.
- Once the second batch of wrist-size wood has ignited, close the door and allow the fire to build. Keep the air control in the fully open position along with the bypass.
- Once the fire is just starting to die down, crack the door open and hold it ajar for a few seconds for the air to adjust. Then add 2-3 large pieces of wood stacked in a manner that allows airflow. (Air control & Bypass still Open)
- Once the large pieces have ignited, close the door completely (Air control & Bypass still Open)
- Once the large pieces have fully ignited and your firebox is full of flames, add 2-3 more pieces of wood & close the door.
- After the second load of wood has fully ignited and your firebox is full of flames, you can fully load the firebox (Air Control & Bypass still Open).
- Allow the new wood to ignite fully.
- Adjust the air control to the desired level.
- Let the stove or insert heat up.
- For best performance, wait until your unit has been running for a while and is quite hot before engaging the catalytic combustor. This step is more of an art than a science and will depend on your specific burning situation; however, you can aim to engage your catalyst between 700-1000 F (370-540 C) by pushing the bypass rod towards the unit. Do not activate the catalytic combustor below 500 F (260 C).
- Walk away! Your wood stove/insert is now burning efficiently.
Now just sit back, relax, and enjoy hours of warmth with your Regency wood stove or insert!
Fireplace Care Videos
Looking for more information about the loading and operation your Regency wood unit? Check out our
Fireplace Care Videos. You will find a library line of videos, including Wood Burning Best Practices, Lighting a Classic Wood Stove, Lighting a Catalytic Wood Insert, Avoiding Smoke In Your Home and many more. Your
local Regency dealer can also assist in answering any questions you may have.