How to Use Your Proflame 2 Remote Control from Regency:
The Proflame 2 system is used on most of our current Direct Vent gas fireplaces, gas inserts and gas stoves. The Proflame 2 Handheld remote is black, if your remote is Silver you have a Proflame 1 system, while some features may be the same some will also differ - this guide is intended for the black Regency Proflame 2 remote control only. The Proflame 2 includes a fully operational handheld remote that is able to control the flame height, lights, blower speed and so much more.
The remote control system is made up of three key components:
- Handheld Transmitter (Remote)
- Receiver (IFC Receiver is typically hidden within the unit)
- Battery Backup Box (Except Hampton Series)
Both the Remote (or Handheld Transmitter) and Receiver require power. The Remote will use 3AA batteries and the receiver must be plugged into a standard 120V plug and will also include a battery backup in case of power outages. The battery backup requires 4AA batteries to operate. It is important to use high quality batteries in these devices as the heat from the fireplace can cause low-quality batteries to lose charge rapidly.
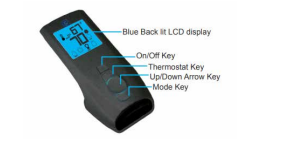
There are 4 buttons on the front of the remote, these include the Power button (On/Off), Thermostat Key, Up Arrow, Down Arrow, and Mode Key.
Replacing Batteries
You will know the batteries need replacing if the Handheld remote does not turn on or if the Digital Screen does not glow blue and there is a battery icon displaying on the top of the display. To replace the batteries in the Handheld open the battery compartment on the bottom of the handheld unit and install 3AA batteries – making sure the positive and negative terminals are aligned correctly.
To replace the batteries in the Receiver, locate the battery backup box and open the battery compartment. Insert the 4AA batteries, again making sure the positive and negative terminals are aligned correctly. The location of the battery backup box will vary based on the unit, however on some Gas fireplaces the backup will be mounted on an interior wall, for gas inserts it will be close to the Receiver, and for Freestanding gas stoves it will be located inside the door. Hampton gas stoves will not have a battery backup box.
Note: The above video shows the process on a Proflame 1 remote control (Silver), however the steps are the same for the Proflame 2 remote (black).
Pairing the Remote
When you press the power button on the remote control, the receiver should beep 1 time followed by ignition of the fireplace in 4-8 seconds. If the receiver does not beep and you have confirmed that all devices have power, its possible your remote and reciever have become unpaired. If your remote has become unpaired from the receiver, you will need to re-pair the two devices by following the steps below.
- Press & Hold the black Reset button on the front of the Receiver (inside the unit) until you hear 3 quick beeps
- Once you hear the 3 beeps Turn the Remote Off and then On again using the Power button at the top
- If paired successfully the Receiver should emit 3 more quick beeps
Remote Functionality
Changing Display Temperature
If you want to change the display temperature of the Handheld remote between Celsius and Fahrenheit,
- First, turn off the remote using the power button
- Press the Mode Key & Thermostat Key at the same time, the displayed temperature will switch between Celsius and Fahrenheit, to change back, simply repeat the process
Changing the Pilot Light Settings
There are two setting for your Pilot Light – Intermittent Pilot (IPI) or Continuous Pilot (CPI). Intermittent Pilot will ignite only when you are lighting the Fireplace – saving you fuel. However in some colder climates its advantageous to keep the pilot running even when the fireplace isn’t being used – or Continuous Pilot.
To switch between the two modes:
- First, turn off the remote using the power button
- Press the Mode button (circle) until IPI or CPI display on the screen
- Use the arrow key up to toggle between the two options
- When CPI mode is enabled, a Snowflake Icon will display on the screen
If your unit is outfitted with a 7-day timer, after 7 full days of inactivity your pilot light in CPI mode will extinguish. You can quickly and easily reset the system by turning it off and on again, once again relighting the pilot light and starting a new 7 day period.
Thermostat Mode
Your remote control can act as a Thermostat, turning the fireplace on & off when the temperature reaches a set threshold.
To enable Thermostat Mode on your Remote follow these steps:
- Remove the battery door from the back of the remote, then press and hold the thermostat button on the front.
- While still pressing the thermostat button, remove one (1) battery from the remote.
- While still pressing the thermostat button, replace the battery. The screen will illuminate and read "Set" this confirms the enabling of the thermostatic functionality and the thermostat icon will be displayed on the top left corner of the remote screen.
- To disable the thermostat function on your Proflame 2 Remote, repeat the steps above. During Step 3, the remote will illuminate and read "CLR" to confirm the disabling of the thermostatic function.
You can also see our guide on
enabling thermostatic remote control function on your Proflame 2 Remote.
Adjusting the Set Temperature
When in Thermostat Mode, you can adjust the desired temperature by clicking the Thermostat button and using the Up/Down arrows to adjust the desired temperature up or down. The Thermostat mode will enable the fireplace to turn on/off to maintain that temperature.
Smart Thermostat Mode
Smart Thermostat Mode allows the remote to adjust the flame height depending on how close the fireplace is to the desired set temperature.
To enable SMART Thermostat mode press the Thermostat button until the word SMART displays next to the Thermostat Icon on the top Left.
Adjusting Flame Height, Lights, and Fan
Press the Mode button (circle) to toggle between the icons at the bottom of the display. To adjust any of the Flame, Lights, Fan, or other accessories press the up or down arrow accordingly. Each accessory is able to be adjusted to 6 different levels or turned off using the up and down arrows.
Note: Not all accessory options will be available with each unit, see your owner’s manual for more information.
Locking/Unlocking the Remote
If you want to prevent unauthorized use of the remote control, you can lock the handheld device and disable all buttons by clicking both the Mode and Up arrow key at the same time. A Lock Icon will display on the screen and now the Remote is locked. To Unlock the remote, simply press the Mode and Up arrow keys simultaneously once again.